Tuesday, 27 March 2012

Sleek iDivine Palettes: Swatches and Review


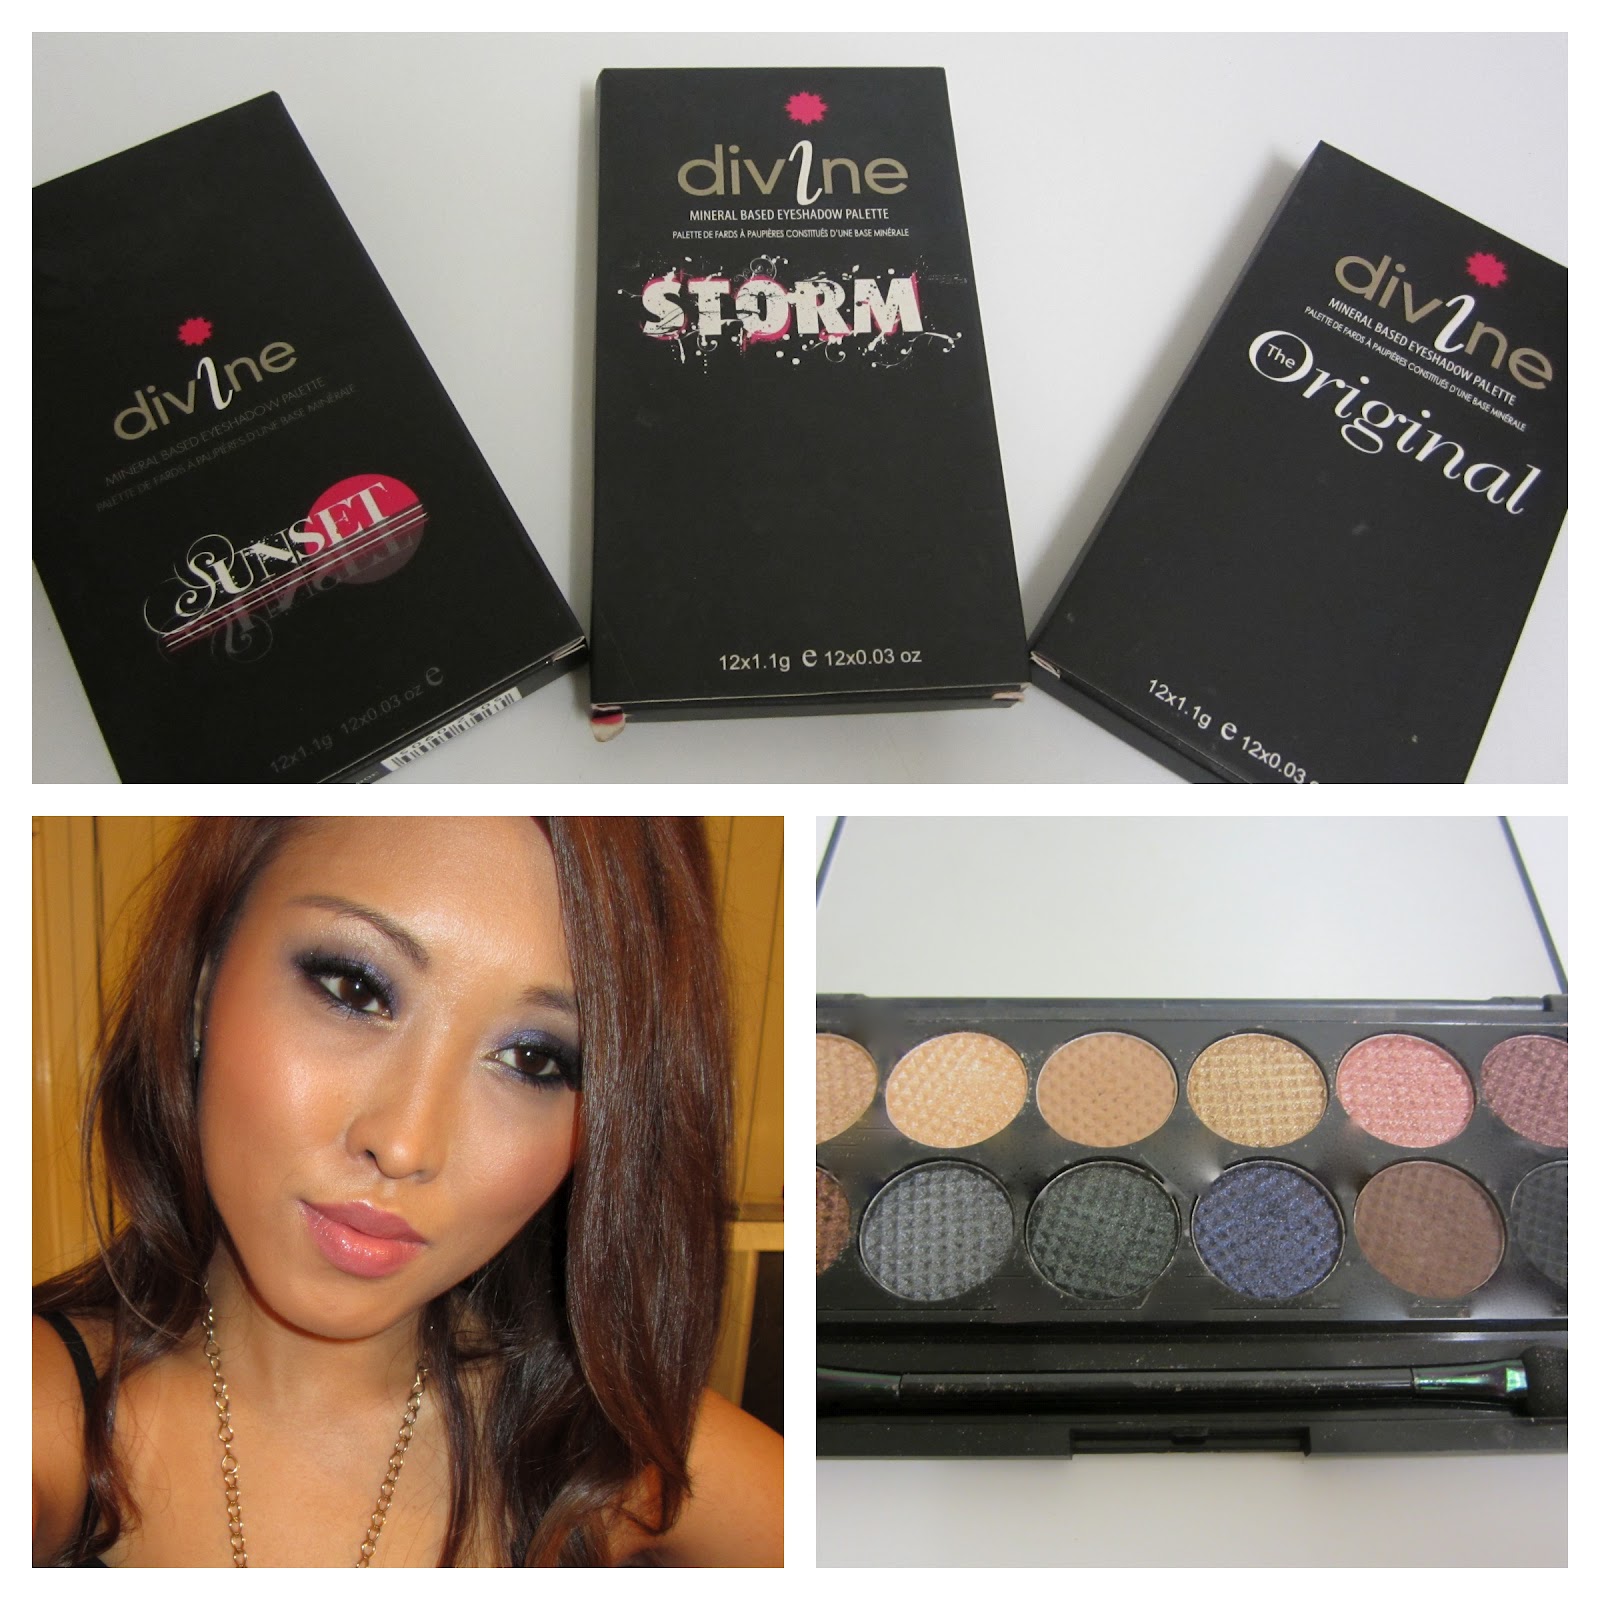
I'm sure many of you have seen or read the raving reviews about these palettes one too many times before but just in case you are not familiar of Sleek Makeup, it is a UK based cosmetics brand very well-known for their high quality eyeshadow palettes. And with their wallet friendly prices, it goes without saying that this is a dream come true for makeup junkies who are on a budget, hence why they are so popular. Sleek offers a total of nine iDivine palettes consisting of a variety of twelve beautiful mineral based eyeshadows in each palette, ranging from neutrals to bright shades. I currently own three of their palettes - The Original, Storm and Sunset. As these are Sleek's older palettes, the eyeshadows have waffle patterns to them (I know weird!) and there are no individual names for the eyeshadows. But these are just a couple of minor details that I can easily ignore.

Storm was the first Sleek palette I've ever owned and from the get-go, I was totally sold on these bad boys. Definitely a winner in my books. I purchased it over a year ago now and to this day, this palette still ranks as one of my top favourite makeup products.


The top row has all neutral shades, perfect for daytime looks. Bottom row has all darker shades which can be used to add depth and intensity to your looks for that dramatic smokey effect.  I love shades #8, #9 and #10 the most and my least favourite out of the bunch is shade #12 which is the matte black. It's not a dud but I find it quite sheer, patchy and not as opaque as the others. Shade #2 is perfect for highlight although for some, it may be too shimmery. I personally don't mind using this to highlight my brow bone if I'm not wearing any other shimmery eyeshadows on my eyes. 
This palette has a mix of warm and cool tones, with three of the twelve shades that are mattes - #3, #11 and #12. And the rest are all metallics with shimmers. Reminds me a great deal of the world famous, NAKED palette. As you can tell by the swatches below, they are not exactly dupes but in terms of wearability you get the picture. Although I must say, shade #8 comes close to being a great dupe for Gunmetal and shade #3 for Naked. 


Just to give you guys an idea of how nice it looks on, the photo below shows myself wearing a night time smokey look with shade #10 on my lids, #11 on the outer corners and #3 on my crease. 


The Original palette on the other hand has all shimmery/glittery eyeshadows except for one which is the matte black. For some reason, Sleek consistently includes this eyeshadow in every single one of their iDivine palettes. Some of you may think it's 'blahh boring' and a waste of space but to me it's no biggie. I think black should be a staple eyeshadow in every palette anyways, although I do think that the pigmentation can be improved. Just saying.


So from the top left we have - black, cool toned lilac purple, deep navy blue, aqua blue, turquoise which leans towards more on the green side, light forest green
Bottom left - cool toned pale yellow with glitters, pale purple/pink and gold duochrome, pale nude champagne pink, dark bronzey copper, golden brown, olive green with gold flash

I found that all of these eyeshadows swatched so smoothly with the exception of the black one, yet again. I'd say this palette is more versatile across the board because it has a combination of basic neutrals and pale colours, brights, super vivid and darker shades. My faves would have to be shades #8 and #12, I love the gold flash duochrome in them. Very unique and makes the colours extra special. 


Sunset is a real treat and once again another richly pigmented eyeshadow palette from Sleek. It consists of browns, russets, and of course it won't live up to it's name "sunset" without the bright orange, yellow and sky blue eyeshadows. 


With the exception of the usual matte black, all of the colours in this pan has a metallic sheen to them, I don't think there is a great deal of shimmers in this pan at all. I absolutely adore shade #2, the rich red fall leaf colour. I think this colour is so unique which you don't generally find in palettes from any makeup brands. I love combining it with shades #3, #5, #8 and #9 to create a beautiful autumn inspired look. In fact, I featured this palette in my last post. If you'd like to check it out, click on the link here.
My least favourite from this palette would have to be shade #6, the sky blue colour. It almost has the same pigmentation as the black, quite sheer and not as blendable as the other eyeshadows.


Packaging in all palettes are the same. It comes in a high quality sturdy but lightweight black casing which embodies the brand's name for its 'sleek' appearance. Looks very classy and is very compact which makes it portable and very easy to travel with. Inside, it comes with a generous-sized good quality mirror and a foam applicator (which I never use).


Each palette retails for $19.95 AU from Crush Cosmetics.  And for 12 eyeshadows in a palette, each eyeshadow works out to be just over $1.60 which is crazy cheap for the amazing colour pay off you get. And in saying that, Sleek palettes totally give high end eyeshadow brands a real run for their money. 
*Side Note: Crush Cosmetics is a great online cosmetics website here in Australia. I've dealt with them so many times before and I've always had great shopping experience with them each time I visited online or made a purchase over the phone. To those of you who may be interested in the Sleek palettes, feel free to check out their website, they also offer international shipping to those who live outside Australia.*

So in a nutshell, I think Sleek palettes contain eyeshadows that are not only incredibly gorgeous, ultra pigmented but are also very affordable. In my opinion, the overall quality of these palettes is almost on par with Mac, Urban Decay and Inglot eyeshadows. Blends easily and has great colour pay off.  The only negative point I can really say about it is the texture. The eyeshadows are uber soft which tend to crumble a fair bit. Handle it with care as you do not want to drop it! I find it most annoying with my Storm palette, I think out of the three palettes I own, this one has the softest texture and just by moving it around in my makeup storage, little specks of eyeshadows go all over inside the palette which is not so pleasant to look at. 

Overall Score: I'd give it a 4.5/5 stars. 

Please note that I do not make biased reviews, what I share with you all is purely based on my personal experience and if I do not like something I'm most certainly not going to sugarcoat my honest opinions about the products I've tried or used.


If you own or have tried any of the Sleek palettes, please do share your thoughts and opinions about them. I would love to know.


Friday, 23 March 2012

Brighten Me Up Casual Friday

Happy Friday my lovely readers! Hope you all have had a superb week.
Here's just another FOTD post to share with you. The rain here in Brisbane has been a downer this past week but I woke up this morning feeling all positive and energised. As you can tell, my mood's totally reflected on my outfit - colourful and fun - not even this miserable Autumn weather could influence and bring down my spirits. It felt like I was almost celebrating Spring with my tangerine top and floral skirt :) It may have been a tad too bright to wear to work but I was seriously caught up in my own little happy bubble that it didn't concern me in the least what other people thought :P

In this look, I used my Sleek Divine "Sunset" Palette. I adore Sleek and I've already started putting swatches together for you guys and writing my thoughts on the palettes. Review post will be up next!


Shade #1 - crease colour
Shade #2 - upper lid
Shade #3 - outer corner
Shade #4 - outer v and outer part of the crease (not passing shade #1)
Shade #5 - lower lid

On my cheeks - The Body Shop Duo Blush in Coral
On my lips - Revlon Super Lustrous in Temptress


I love my owl necklace! So cute!!


Casual Fridays at work is the best. The environment is a lot more relaxed and everyone tends to wind down slightly because we are all looking forward to the weekend. Hmm... but what would be even better is if Fridays are made to be part of the weekend, don't you think? Lol.


HAPPY WEEKEND LOVELIES!


Sunday, 18 March 2012

Taylor Swift Inspired Makeup Tutorial

Country music has never been a favourite of mine but there's something about Taylor Swift and her songs that I just can't get enough of. Not only is she amazingly talented but I think she is so beautiful and glamorous and her makeup always looks amazing. So in saying that, I decided to do an inspired look from one her old music videos, "Our Song". I absolutely loved the green look she wore in the beginning of the video and I've always wanted to recreate it. In my last post (St. Paddy's Day Makeup Look), I mentioned that I want to do more green makeup tutorials, and I thought this is the perfect time to finally have an excuse to wear this makeup look :)


Here is the Inspiration...


Here's the Inspired Look...


Face products

Mac Prep + Prime Face Protector SPF 50
Bobbi  Brown Corrector - Light Peach
Revlon Colourstay Foundation - True Beige
Laura Mercier Loose Powder
Nars Bronzing Powder - Casino
Milani Baked Blush - Luminoso
Mac Highlighter - Soft and Gentle

Lip products

Rimmel London Kate Lipstick in #14
Napoleon lip gloss in Mauritius Peach

Eye products


Crush Cosmetics 88 Ultra Shimmer Palette (I numbered the colours I used in the picture)
Urban Decay Naked Palette - Virgin eyeshadow
Mac Loose Pigment - Golden Olive
Mac Pro long wear eyeshadow - Legendary Black
L'oreal Infallible Eyeshadow - Permanent Khaki
Mac Paint Pot - Painterly
Bobbi Brown Gel eyeliner - Black
Urban Decay Primer Potion - Original
Maybelline Falsies Mascara - Blackest Black


How to step by step

  • Prime the eyes using UDPP.
  • Apply a small amount of Painterly paint pot all over the lid using ring finger. 
          TIP: use as little product as possible to avoid your lids from drying out.
  • Dab a good amount of loose powder under the eye. This makes it easy swiping off any fallouts on the cheeks/face after applying the eyeshadows.      
  • Using #1 (lime green colour) from the Crush Cosmetics 88 Shimmer Palette, apply it all over the lid up to the crease using an eye shading brush and then blend out any harsh lines and edges using a blending brush. 
  • Using the other side of the eye shading brush, dip it in Mac's Golden Olive pigment, tap off any excess to prevent fall out and pat it all over the lid on top of the lime green colour. Using a small tapered blending brush, also place it on the outer corner, building it up to a darker colour.
  • Going back to the Crush Cosmetics palette, pick up colours 2, 3 and 4 and pat it all over the lid and inner corner using the same side of the shading brush used with colour 1. Line the lower lash line as well.
  • Grab the same tapered blending brush, pick up Permanent Khaki and pack it on the outer corner, blending it outward. Line the outer third of the lower lash line as well.
  • To give the eyes more definition,  pick up Legendary Black and place it on the outer v and work it in to the crease of my eye socket with a back and forth motion.
  • With a light hand, use a clean blending brush to blend out all harsh lines and edges.
  • Line upper lash line with BB gel eye liner and wing it out using an eye liner brush.
  • Tight line and line waterline with a black eye pencil. I used Mac's Smolder (I forgot to take a photo).
  • Using a flat shader brush, highlight the brow bone with UD's Virgin.

And Voila!! <3


I definitely enjoyed creating this look and I hope you guys liked this tutorial.


Friday, 16 March 2012

FOTD: St. Patrick's Day "Keen As a Bean For Green" Eye Makeup

Going on a bender this weekend to celebrate St. Patrick's Day? Well I'm not, but I'm still in a festive mood and want to get in to the St. Paddy's spirit, so I thought what better time to blow the dust off those neglected green eyeshadows of mine and have a little play or two with my long lost friends. And after searching for all the green eyeshadows that are quietly stashed in my makeup storage, it occurred to me how much I have that are crying out for love and attention. I just don't find myself reaching out for a green eyeshadow on a regular basis. But I will however attempt to use them more often in the future as they are indeed beautiful :)

As it was already late in the afternoon, I did a rush job of putting on my makeup so I could use the natural light and take photos before it goes dark. I don't have my regular camera with me at the moment so 'Instagram' pics will have to suffice for now. Anyways, here's how my little experimenting turned out... 

Ahhh I wish I took my time doing my brows though! LOL. Sorry guys! 

EYESHADOWS USED


Urban Decay Kush (all over lid colour) - a metallic bright medium (almost lime) green colour with a hint of silver shimmer 
Urban Decay Graffiti (all over lid colour on top of Kush and lower lash line colour) - a metallic sheen vibrant grass green colour
Urban Decay Loaded (outer corner and crease colour) - a metallic sheen deep forest green colour. Very dark that it almost comes off black
Inglot #57 Loose Pigment (lower lash line) - dark jade green colour
Urban Decay Money (inner corner and tear duct) - silvery pale green colour with a lot of shimmer

I must admit, this eye makeup is not for everyday wear. It looks toned down in the photos but it is in-your-face bright, daring and screams 'wowzaa' in real life. Nevertheless, I had so much fun creating this and I kinda like it. I think this look will come handy one day when I feel like wearing bold colours at night or when I'm due to attend another costume/dress up party :D 

Now that I re-discovered my other green eyeshadows, I'll endeavour to make a couple more looks over the next few days to give tribute to St. Patrick's Day.


By the way BlogLoveTherapy is hosting another blog hop. It is really fun to be a part of and a great way to discover other blogs and make new friends. If you'd like to participate, check out her blog soon as the hop ends in two days. 


HAVE A FANTASTIC WEEKEND EVERYONE!


Friday, 9 March 2012

Must Have: Mac Coppering eyeshadow

Mac Coppering is a gorgeous copper orange eyeshadow with a veluxe pearl finish. This is one of my absolute favourite Mac eyeshadows. It can look a little bit intimidating in the pan if you are not a fan of bright eyeshadows and not brave enough to wear orange, but fear not ladies...due to its reddish/pinkish, bronzy/goldy undertone, it comes off totally different on different skin tones, making it such an interesting, unique, versatile colour. In my opinion, I think it compliments all skin tones and eye colours. And depending on how you apply it, it can easily be a wearable eyeshadow. It has no shimmer (a big tick for those of you who don't like shimmers all over your eyes/face), highly pigmented a little goes a long way, smooth texture, blends so beautifully on to the skin and lasts all day. Great to wear all year round no matter what the season is and it looks awesome teamed up pretty much with any other colour/s - browns, greens, golds, purples, pink.. you name it. Pat it all over the lid and build it up for an intense look or lightly apply on to the crease for a pop of colour. Price is US$15 / AU$33 which is expensive for many, but if you are fishing for a new Mac eyeshadow, I would highly recommend to get this one. Definitely a must-have in your makeup collection.


LOOK #1: COPPERING AS A CREASE COLOUR

EYES

Mac Mythology (on lid)
Urban Decay Psychedelic Sister (upper and lower lashline)
Mac Naked Lunch (brow bone)
Urban Decay Snatch (inner corner/tearduct)
Bobbi Brown gel eyeliner in black (tightline)
Rimmel London soft kajal eyeliner in pure white (waterline)
Maybelline Falsies mascara

FACE

Mac Matchmaster foundation in 5.0
Laura Mercier loose translucent powder
Nars Casino bronzer
Mac Subtle Breeze blush
Mac Soft and Gentle highlighter

LIPS

Mac Viva Glam Gaga lipstick
Napoleon lip shine in Berlin


LOOK #2: COPPERING AS A LID COLOUR

EYES

Mac Texture (crease)
Mac Twinks (outer corner)
Mac Mythology (inner corner)
Mac Naked Lunch (brow bone)
Urban Decay Graffiti (lower lashline)
Bobbi Brown gel eyeliner in black (upper lash line)
Mac eye kohl pencil in smolder
Maybelline falsies mascara

FACE

Mac Matchmaster foundation in 5.0
Laura Mercier loose translucent powder
Nars Casino bronzer
The Body Shop baked blush in Coral

LIPS

Nyx Frappucino lipstick
Nyx Lala lipgloss


Have you tried Coppering before? How do you like to wear it?
Let me know your thoughts and share your tips in the comments section below :)


Saturday, 3 March 2012

March Haul Part #1


Hello beauties! My blog's 2nd monthsary is in a few days and I'm so excited to have reached 400 followers. Yay!! Blogging is so much fun. I'd like to thank all of you lovely readers for taking interest in my blog and for showing your support since the very first day I've started blogging. I truly appreciate it! (: I've also discovered so many blogs that I enjoy reading and that have given me lots of ideas, tips and inspirations. I love it! Nothing would thrill me more than being able to give it back and inspire you guys as well :D

By the way I've just recently joined Twitter so feel free to connect with me through there too if you like. Would love to interact with you guys outside blogger.

Anyways.. Today, I'd like to share with you guys what I have purchased recently.
I normally include swatches in my hauls but since I plan to do a review on the lip products anyway, I skipped out on the swatches this time. 

 London Rebel Nude Pumps (bought from Famous Footwear)

 Marikai Black Satchel (bought from Strandbags)

OPI Holland Collection (purchased from Price Attack)

*I'M A BIT EMBARRASSED PUTTING UP MY MESSY NAIL POLISHES ON DISPLAY, BUT I REALLY WANTED TO SHOW YOU GUYS WHAT THE COLOURS LOOK LIKE SO PLEASE EXCUSE THE UGLY FINGERS AND NAILS. LOL*


(Left): Dutch 'Ya Just Love OPI 
(Right): Kiss me on my tulips

 1. Mac Viva Glam Gaga 2 Lipstick
2. Mac Shop Cook Collection - Innocence Beware Lipstick
3. Rimmel London Kate Lipstick in 14
4. L'oreal Color Riche Natural Lipstick in Silky Toffee
5. Napoleon Lipgloss in Mauritius Pink
6. Napoleon Lipgloss in Island
7. Napoleon Luscious Lip Shine in Berlin
8.. Maybelline Colossal Mascara in Glam Black

Melrose Avenue Dress


This was my first ever Lush purchase. I've seen and heard about it from YT gurus and fellow beauty bloggers and I've also walked passed the store so many times before but never really bothered taking the time to check it out. But when I finally went in there the other day, I was instantly sold and ended up getting a few more than what I really need (as you can probably tell by the amount of products that I bought lol). I've just tested all of these products today and they have definitely lived up to the hype especially the hair and lip products. My hair and lips are feeling awesome already!! But more on that later. Stay tuned for the reviews!

1. Lush American Cream
2. Lush Retread
3. Lush Rehab
4. Lush R & B
5. Lush Mask of Magnaminity
6. Lush Ocean Salt
7. Lush Mint Julips Lip Scrub
8. Lush Honey Trap Lip Balm
9. Lush Fresh Farmacy Cleansers
10. Lush Strawberry Feels Forever Massage Bars


Have you tried any of the above products? Share your thoughts in the comments section below.

KEEP YOUR EYES PEELED FOR PART 2 OF THIS MONTH'S HAUL :)